Saturday, 28 December 2013

White Christmas

Been up visiting family over the holidays in Canada and enjoying a lovely cold, white Christmas! Quite a change from Perth and the normal blistering heat that accompanies the festive season! Dave and Sally are keeping the gardens watered and the plants harvested, but don't expect a blog update until I get back late January.
Wishing everyone a very happy new year!


- Posted using BlogPress from my iPhone

Monday, 11 November 2013

Garlic braiding

A few days ago I harvested all the garlic I planted mid winter, having no idea what I was doing really. It was a bit of a long shot as to what exactly I would be pulling up as I wasn't exactly sure when I should be harvesting them, so I just took a rough guess and went for it. None of the bulbs were massive, but all looked roughly like garlic, and I planted enough so that even though each bulb isn't huge, we should still have enough home grown garlic to last us until next winter. Then where and how to store it were the next questions. I had seen garlic braided before so thought I'd give that a go (thanks YouTube) it was a bit harder than I imagined, as apparently I didn't braid enough hair in my youth. I think it is slightly twisted from subaverage braiding skills but I still think it looks pretty cool and now can hang proudly on the bathroom door (only nail in or around the kitchen I could find). So here are some pictures along the way to the finished product. :)


The haul of garlic after drying and cutting off the roots to make em' look purdy.


Mid braid. Maybe Girl Scouts would have given me the braiding abilities I am obviously lacking.


Finished string of garlic! Looks almost like a modern work of art, maybe it can symbolize the protagonists struggle against voodoo economics.


No vampires in our bathroom tonight!

Sunday, 10 November 2013

Summer is here!

Well summer seems to have arrived with a vengeance! These last two weeks have had almost every day over 30, with yesterday reaching 39 on our home weather station! Poor veggies, but they all seem to all be doing well even in the heat. With all the beds heavily mulched with the pea straw I got a few weeks ago the soil seems to be staying cool and moist even through the long hot days. This morning before it got too hot I went out and made a trellis for my beans to climb up that are already growing quickly. Hopefully they'll start growing up the support system now it has one, and I'm just hoping its tall enough!!


Bean trellis, two different varieties of beans, both runner style, one is a yellow butter bean and the other is a purple variety that I've forgotten the name of at the moment.


Cucumber bed with one of the two trellises that the cucumbers will grow up. I'm hoping because cucumbers usually require lots of space to spread out, I can fit a lot more in a small space by growing them vertically, making it easier to pick the fruit and keeping it off the ground should reduce pests eating the cucumbers.


Little cucumber seedlings just sprouting!


Blackberries are coming along well, most should be ripe and ready to eat within a week or two. Yummy!


Front bed with pumpkins, zucchini and a couple of extra cucumber plants. There are a few little zucchinis already, and the pumpkins are flowering nicely. Thankfully they are right next to my flower bed out the front so hopefully they'll get pollinated by bees attracted to the garden by some colour this year. I struggled last year to get certain plants pollinated as there weren't any flowers in the garden, so I think the bees weren't enticed to check out my veggies. Hopefully this year that will be different! :)

Sunday, 27 October 2013

Garden update

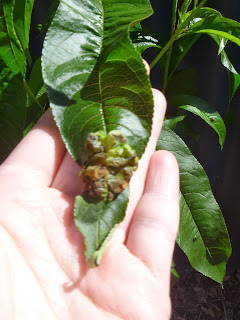
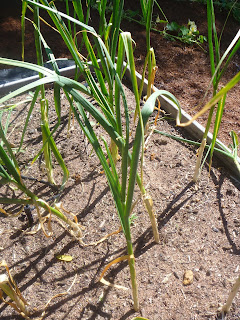
Chatting to my folks last night brought up the topic of what was growing around my place at the moment, specifically my onions and garlic and a strange puckering on a few of my peach leaves. My onions don't seem to be bulbing out at the bottom just yet, maybe they need more time in the ground, and my garlic have yet to form it's scapes, so here are the photos I promised, plus one of our Thanksgiving dinner we had here a couple weeks ago. :)

Thanksgiving dinner Aussie style. Burnt ham and roast chook!

Peach tree #1

Puckered leaf on peach tree


Blackberries!

Apple blossoms

Dog house I intend to transform into a chicken coop.

Allum bed - Onions and garlic

Close up of one garlic plant. No scapes?

CLose up of base of onions. Fat but not bulby.


Sunday, 13 October 2013

Front Yard Finishing Touches

Yesterday Dave and I finally got round to finishing off the front yard with the jarrah sawdust we put around all the other beds and lined it all with weed mat. We also got two native fish for our pond to help keep down mosquito larvae and hopefully reduce mosquito numbers around our place.
After what seemed like hours of reweeding the area we needed to put weedmat down on the rest went fairly quickly. It was a lovely day for it, not too hot and not too cold, and now the front yard looks great! Now just to save up for our white picket fence!
We took some photos along the way, enjoy!
Weed mat laid down all along the areas about to be covered

Dave hard ar work shoveling the sawdust

Herb sprial crazyness. The nasturtium has gone viral and now trails all the way up and over the back fence

The pond with our two new residents. Impossible to see through the pond plants.

All finished!

Looking like the hippie I am. :)

Monday, 2 September 2013

Recycled Pallet Workbench

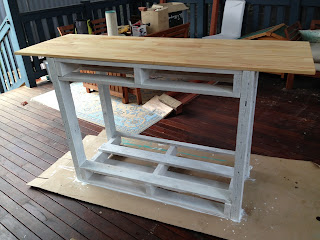
I saw a bench made out of a recycled pallet on a particularly awesome Pintrest board (Thanks Clay!), and after I saw it I knew I had to make one for myself. I had already been looking at getting a workbench to put in my craft room, and after seeing some at IKEA for between $399 to $699 (which is just crazy) I decided to recycle some things we already had lying around the house and make one. Everything aside from the wooden top and screws are recycled. The pallet was what the limestone blocks got delivered on for the pizza oven base, and the legs are out of wood I found lying under the house. Even the paint was already in the shed from the previous owners and got put to good use. It went together pretty quickly, and I'm really happy with the result. Who needs an expensive workbench when you can make something yourself for the grand total of $33 dollars! The wood top was $20 and the screws $13.Take that IKEA!
The sad lonely pallet before inspiration struck. It was going to be broken up and thrown out, and I only took this pic to give to the mover for getting the pizza oven into our backyard.

Base all built and half painted
The finished product! :)


Sunday, 11 August 2013

Crop Rotations and Fruit Plantings

With spring rapidly approaching it's time to start getting things ready for planting the new summer crop for 2013/14. With all the raised beds now built and ready to go, this will be the first summer season of full produce production potential. We also finished planting some of the last fruit trees around the back fence that we have room for, that being one dwarf avocado tree and a second dwarf peach to add to the one we already have planted that we received as a wedding present last season. I also stumbled across a very interesting program that lets you map out your garden plot, to keep yourself organized when it comes to crop rotations, plant spacings, etc. I've been having far too much fun playing around with it the last couple days and this is what I've come up with for what I'll be planting for this upcoming spring/summer season. I haven't had enough time to figure out all the cool tricks but so far find it useful just to keep me on track of what I need to plant where and how many for the size of the beds.
So that's what the gardens look like on paper... I thought I'd take a few pictures to show what it looks like in reality.

Bed 1 -Two varieties of lettuce and two rows of carrots
Bed 2 - Snow peas, broad beans and sugar snap peas
Bed 3 - The remaining kohl rabi, broccoli, cabbage and kale. Most of it will be pulled out and used shortly to make way for the new spring crops.
Bed 4 - Just planted zucchini, pickling cucumbers and pumpkin yesterday.
Bed 5 - This bed is still going quite strong from last year, most likely will keep the rainbow chard and fennel in until it stops producing, and plant the remainder of the bed with the new crops.
Bed 6 - Parsley and chives growing well, so again will plant around them with new season crops
Bed 7 - Onions and garlic bed growing well. Will look forward to tasting our first crop of both!
Bed 8 & 9 - Potatoes are growing insanely well. Dave is super excited to try his first home grown crop as he's been involved with these every step of the way. He's so cute when he gardens. :)
Bed 1

Bed 2
Bed 3


Bed 4
Bed 5
Bed 6
Bed 7
Beds 8 & 9

Wednesday, 3 July 2013

The Handy Girls Can Do It!

After planting some climbing peas and broad beans came the question of what they were going to grow up. I had made some climbing apparatuses in the past for climbing peas, but they didn't really stack up all that well once the peas took off as they usually slumped under the weight of the plants. So it finally came time to make a more sturdy, long lasting device that my plants could grow up and that I could use season after season.
I came across plans online to make an A-frame trellis which seemed simple, sturdy and looked nice, so on Sunday, Dave and I went to Bunnings, picked up all the bits and pieces we needed to build the first test trellis to see if I liked it before building the next two.
Seeing as I'm uni holidays at the moment, I decided why wait for the weekend when Dave could help and build it myself! Dad has always taught me to use power tools with confidence (or at least with a healthy respect for the fact fingers saw off just as easily as timber) so I plucked up the courage and got to it! It took me two afternoons of working on it, and I think it turned out pretty darn well!

Three things I learned from this project:

1. Measure twice and cut once. At the beginning as I was figuring out where to cut the wood that would become the top and bottom pieces. I plugged into the calculator 2.8 meters when it actually was 1.8 meters, it was only as I was about to cut it I thought, 'Hey, wait a minute that doesn't look right!'. I am very thankful I went back again, remeasured and fixed it before cutting or I would have been super annoyed.

 2. When making a square, 'almost square' doesn't quite cut it. I got it pretty close, but then when attaching the hinges noticed they didn't line up quite right. Thankfully you can't notice it when it's standing in the garden but it's something to keep in mind for next time.

3. Listen to your mother when she says to wear work gloves when working with chicken wire. That stuff is evil! Whoever named it 'chicken wire' was way off. They should have called it 'razor sharp metal sheet of death wire'. That would have been more accurate. On day two I wore gloves.

All in all I am very proud of my garden trellis even if it's not perfect, as this is the first wood working project I've completed entirely on my own with no help from either Dave or my dad. Here are some pictures of the building process along the way.

Cutting all the boards so they were all the exact same length


First side of trellis screwed together

First side with aforementioned evil chicken wire.

Second side with the wire adding process in mid staple

The two sides lined up with hinges on

Tah dah!

Placed in the garden!


Tiny little pea seedlings ready to climb!


Sunday, 30 June 2013

Winter Garden Updates!

It's been a little quiet on the updating around here this winter, so I thought it was about time to do some garden and hobby recapping. Some of the summer veggies are still going strong, with a lot of the root crops staying in the ground until we need them. The tomatoes are pretty much finished, and the leafy greens are mostly done. Things like the broccoli, cabbage and parsnips are still growing and still not quite ready, so hoping they get a wriggle on and finish up soon! Winter things planted lately include three beds of potatoes, garlic, onions, two types of peas, broad beans, carrots and lettuce. Most of these are still in the seedling stages but are all doing well and seeming to enjoy the cooler days and moister soils than in summer.

Dave and I headed down to the Midland Farmers Market yesterday and found that unlike a lot of other markets, this one had plenty of stallholders selling fruit and veg, and the prices were way cheaper than any supermarket. We went a little crazy as the photo shows, we got a good variety that should last us all week. All of that for well under $50 makes us happy people.
Fruit n Veg haul from the market. Tonight: Pork chops with apple and fennel and roasted veggies.
Winter garden beds. Top left: Two varieties of lettuce and two of carrot. Just starting to sprout now, so we should have lettuce in about 8 weeks and carrots during the spring & summer months Top right: Kohl rabi, broccoli, cabbage and kale which were all planted when my folks were here in December and January. Not sure if cabbage and broccoli should take this long? The cabbage is finally starting to form their inner heads, but still no love from the broccoli.
 The onions and garlic bed. Two types of onion, brown and pickling onion, and garlic that I picked up at Perth City Farm which all sprouted and are now looking quite nice.
This is the garden bed that has the most going on in it still from summer. Rainbow chard that seems to be the veggie that just keeps on giving. We keep taking and it keep growing fast enough to keep up with us. Quite impressive actually. Then we have a large crop of beetroot still, as I thought Dave liked them (which apparently he doesn't), and I sure don't like it, so it's just sitting there until someone comes along and steals it or I can give it away. Then parsnips, spinach, carrot and fennel, all of which seem happy and growing well. Tonight I might pick the first parsnip to add to some roasted veggies. Exciting!
 The two tubs of olives we have picked off our tree brining away. They are both 30L tubs so I think we'll have enough olives to last us for a really long time. Next year we plan on using all the olives to attempt to make our own olive oil, which should be fun!

 Potato beds and closeup of plants. The are still pretty small, but so far looking good. Can't wait til we can dig up and roast some freshly grown potatoes! Nothing better! Yum yum yum.
Dwarf peach tree that we got as a wedding present is now planted and is looking quite happy, although it's leaves are starting to drop off for winter now. It already had peaches on it last year while the poor thing was still only in a little container, so excited to see how many we get off it this year. :)